

This article will outline the steps for installing Odoo 15 on Ubuntu 18.04.
Prerequisites
Operating System: Linux Ubuntu 18.04
Server Resources: 2-core CPU & 2GB of RAM
Access: Ability to connect to a server via SSH
Permissions: a user with root privileges (able to use the 'sudo' command)
Note: you can execute all of the commands below from the 'root' user, but for security purposes, it is recommended that you use a separate user with sudo privileges.
Step 1: Connect to the server via SSH
The first step in the installation is to connect to your server via ssh. Use the following command
ssh username@IP_Address -p Port_numberReplace the 'username', 'IP_Address', and 'Port_number' with the correct ones for your server.
Step 2: Update the server
Update existing Ubuntu packages and upgrade them into newer versions. The following commands will help you.
sudo apt-get updatesudo apt-get upgrade -yStep 3: Create an Odoo user in Ubuntu
Create a new user called odoo with home directory /opt/odoo. This prevents the security risks posed by running Odoo under the root user. You can do it with this command. You can give any name to the user. However, be careful to create a PostgreSQL user with the same name.
sudo useradd -m -d /opt/odoo -U -r -s /bin/bash odooStep 4: Install and Configure PostgreSQL
Odoo uses PostgreSQL as the database back-end. Install the database server for Odoo By using the following command.
sudo apt-get install postgresql -yCreate a PostgreSQL user for the handling of the database server i.e. PostgreSQL. In our case, we will create a PostgreSQL user with the same name as the previously created system user i.e odoo.
sudo su - postgres -c "createuser -s odoo" 2> /dev/null || true
Step 5: Install Python PIP Dependencies and other required Packages
There is a number of packages that need to be installed in order for Odoo 15 to work. Use the following commands to install them.
sudo apt-get install git python3 python3-pip build-essential wget python3-dev python3-venv python3-wheel libxslt-dev libzip-dev libldap2-dev libsasl2-dev python3-setuptools node-less libjpeg-dev gdebi -ysudo apt-get install nodejs npm -ysudo npm install -g rtlcssStep 6: Install Wkhtmltopdf
Wkhtmltopdf is the package that allows Odoo 15 to print PDF reports. It converts HTML (web page markup) to PDF, but it's not present in the official package list nor the EPEL repository. We’ll install the fonts required and download and install the package from Github.
sudo apt-get install xfonts-75dpisudo wget https://github.com/wkhtmltopdf/packaging/releases/download/0.12.6-1/wkhtmltox_0.12.6-1.bionic_amd64.debAfter it has been downloaded, we'll use these commands to install it.
sudo dpkg -i wkhtmltox_0.12.6-1.bionic_amd64.debsudo cp /usr/local/bin/wkhtmltoimage /usr/bin/wkhtmltoimagesudo cp /usr/local/bin/wkhtmltopdf /usr/bin/wkhtmltopdfStep 7: Create Log Directories
Create directories where Odoo will save its log files. Use these commands to create the log directory inside the Odoo directory.
sudo mkdir /var/log/odoosudo chown odoo:odoo /var/log/odooStep 8: Install Odoo 15
First, we'll change the user so as to install Odoo as the user odoo.
sudo su - odooThen we'll make sure git is installed in the system using this command.
sudo apt-get install gitNext, we'll clone the Odoo 15 source code from github.
git clone https://www.github.com/odoo/odoo --depth 1 --branch 15.0 /opt/odoo15/odooStep 9: Create a Python Virtual Environment
To separate Odoo's Python modules from the system's Python modules, we'll need to set up a Python Virtual Environment inside which we'll install Odoo. Use these commands to achieve this.
cd /opt/odoo
python3 -m venv odoo-venv
Next, we activate the virtual environment.
source odoo-venv/bin/activate
Step 10: Install Odoo Dependencies
All dependencies for Odoo are specified in the requirements.txt file. We'll use pip to install all required Python modules.
pip3 install wheel
pip3 install -r odoo/requirements.txt
When we're finished, we deactivate the virtual environment
deactivate
Step 11: Create Directory for third party addons
We’ll create a new directory a separate directory for the 3rd party addons.
mkdir /opt/odoo/odoo-custom-addonsThis directory should later be added to the addons_path parameter which defines a list of directories where Odoo searches for modules. After this step we will switch back to the sudo user using this command.
exitStep 12: Create a configuration file for the Odoo Installation
The command below allows you to create and edit a *.conf file.
sudo nano /etc/odoo.confAdd the following configuration information to the file.
Note: Remember to change the admin_passwd to something more secure.
[options]
; This is the password that allows database operations:
admin_passwd = my_admin_passwd
db_host = False
db_port = False
db_user = odoo15
db_password = False
xmlrpc_port = 8069
logfile = /var/log/odoo/odoo.log
logrotate = True
addons_path = /opt/odoo/odoo/addons,/opt/odoo/odoo-custom-addons
Step 13: Creating Systemd Unit File
This is a configuration ini-style file that holds configuration information about a service. We'll be creating a file named "odoo.service".
sudo nano /etc/systemd/system/odoo.serviceAdd the following configuration information to the file.
[Unit]
Description=Odoo
Requires=postgresql.service
After=network.target postgresql.service

[Service]
Type=simple
SyslogIdentifier=odoo15
PermissionsStartOnly=true
User=odoo15
Group=odoo15
ExecStart=/opt/odoo/odoo-venv/bin/python3 /opt/odoo/odoo/odoo-bin -c /etc/odoo.conf
StandardOutput=journal+console

[Install]
WantedBy=multi-user.target
With the next command, we are notifying systemd that the new file exists and reloading the daemon.
sudo systemctl daemon-reloadNext, we start the Odoo service and enable it to run on system boot.
sudo systemctl enable --now odooNow we check if the service is running.
sudo systemctl status odooYou should get the following output.
● odoo.service - Odoo
     Loaded: loaded (/etc/systemd/system/odoo.service; enabled; vendor preset: enabled)
     Active: active (running) since Tue 2021-10-26 09:56:28 UTC; 28s ago
...
This next command will allow you to check on the messages logged by the odoo service.
sudo journalctl -u odooStep 14: Testing the Odoo Installation
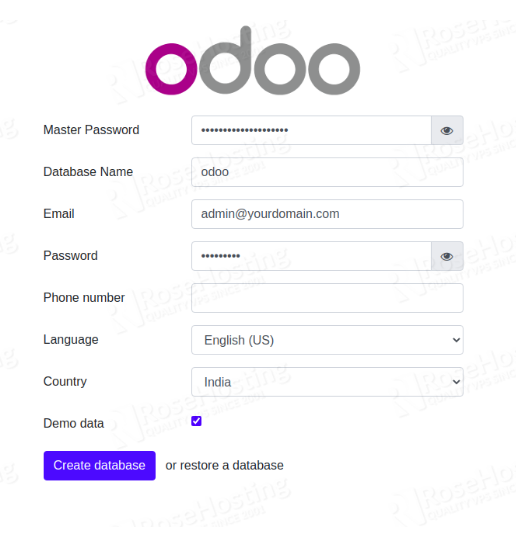
On your browser, type: http://<your_domain_or_IP_address>:8069
If the installation was successful, you'll see the start page for Odoo 15.
Congratulations! You have successfully installed Odoo 15 on Ubuntu 18.04

