

This article outlines how to access the R1Soft Server Backup Manager web interface through any of our supported web browsers, such as Chrome, Firefox, or Internet Explorer.
Accessing the Backup Manager from the Local Machine
You can connect to the Backup Manager Web Interface from the Windows Start Menu (Start > All Programs > Server Backup > Server Backup Manager). If the user chose a different name during the Server Backup Installation, this path may be different.
You can also connect to the Backup Manager Web Interface from the computer where it is installed by typing "localhost" into the address bar of the web browser. If the user chose a different HTTP port other than the default port "80" during the installation, specify the port; for example, "http://localhost:8062".
Accessing the Backup Manager over the Internet/LAN
In the address bar of the browser, type the IP address (Host Name) of the Backup Manager e.g.
http://178.120.122.126
In Windows, you can learn the IP address of the computer by running this command in the command prompt:
ipconfigUse the following command in linux:
ifconfigIf the user chose a different HTTP port other than the default port "80" during the installation, specify the port; for example, "http://178.120.122.126:8062".
Accessing the Backup Manager Using a Secure Connection
You can use the following connection types to connect to the R1Soft Backup Manager web interface:
- The Backup Manager Web Interface - Uses HTTP protocol
- The Backup Manager Secure Web Interface - Uses encrypted (SSL) HTTPS connections
The Backup Manager Secure Web Interface uses encrypted (SSL) HTTPS connections. To access the Backup Manager securely, add "https://" before the IP address (Host Name) of the Backup Manager.
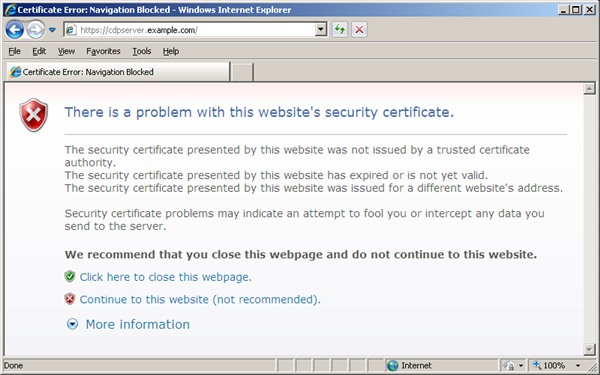
The Backup Manager comes with SSL already set up. By default, SSL works with a self-signed certificate. This certificate can be used for encryption only and does not prove the identity of the server. That default certificate is not signed by any well-known Certification Authority (CA), so when the users try to open the SSL version of the Backup Manager Web Interface, they usually see the warning in the browser window as shown below.
It is recommended to obtain a certificate signed by a well-known CA. The role of a CA is to verify that the Backup Manager you are trying to access actually has the name you are trying to access it by and that this server actually belongs to your organization. Every browser comes with a pre-defined list of well-known CAs. Before the CA can issue you the certificate, you should generate a private key and the certificate request and send it to the CA for signing.
To enable a certificate, you need to use the Java keytool - a key and certificate management utility. The keytool stores the keys and certificates in a so-called keystore. The following steps for installing a purchased certificate apply to GoDaddy and VeriSign.
Step 1: Connect to the Linux server where the Backup Manager is installed via SSH with root privileges.
Step 2: Upload the key and the certificate to Backup Manager.
Step 3: Navigate to the directory where the keys are located using the "cd" command.
Step 4: Convert the key and the certificate files from PEM into DER format using the following commands.
openssl pkcs8 -topk8 -nocrypt -in wildcard.r1soft.com.key -inform PEM -out wildcard.r1soft.com.key.der -outform DER

openssl x509 -in wildcard.r1soft.com.crt -inform PEM -out wildcard.r1soft.com.crt.der -outform DER
Step 5: Navigate to the directory where the keytool is located using the "cd" command. Grant everybody the permissions to execute the keytool and java applications. The versions of these applications that come with Backup Manager are not executable, so you have to run chmod 755 as follows.
chmod 755 java keytoolStep 6: Download the ImportKey utility using the wget command as follows.
wget http://repo.r1soft.com/contrib/ImportKey.class Step 7: Launch the ImportKey utility and create the keystore file (default name is keystore.ImportKey) in your home directory (root). The private key and the certificate will be placed there. Use the following command.
./java ImportKey /root/wildcard.r1soft.com.key.der /root/wildcard.r1soft.com.crt.der cdpStep 8: Use the following command to set the password for your keystore file. The default password is importkey. Enter it when prompted and then type the new password, which must be set to "password".
./keytool -storepasswd -keystore /root/keystore.ImportKeyStep 9: Use the following command to set the password for the key file in the keystore. The default password is importkey. Enter it when prompted and then type the new password, which must be set to "password".
./keytool -keypasswd -alias cdp -keystore /root/keystore.ImportKeyStep 10: Rename the keystore.ImportKey file to keystore using the following command.
mv /root/keystore.ImportKey /root/keystore Step 11: Use the following command to download the trusted certificate from the Certification Authority (CA) (Go Daddy).
wget -no-check-certificate -O /root/sf_issuing.crt https://certificates.godaddy.com/repository/sf_issuing.crt Step 12: Import the downloaded trusted certificate into your keystore file using the following command.
./keytool -import -alias intermed -file /root/sf_issuing.crt -keystore /root/keystore -trustcacerts Step 13: There may be another keystore in the R1Soft folder. To make a backup copy of it, you should rename it (for example, to "keystore.old" as shown below).
mv /usr/sbin/r1soft/conf/keystore /usr/sbin/r1soft/conf/keystore.oldStep 14: Copy the new keystore file to the R1Soft folder using the following command.
cp /root/keystore /usr/sbin/r1soft/conf/keystoreStep 15: Restart the Backup manager using the following command.
/etc/init.d/cdp-server restartYou can now access the R1Soft Backup manager over the internet with a secure SSL encrypted connection via HTTPS.

