

A R1soft Disk Safe is where the backup data from a server is stored. It is important to create each Disk Safe on a server with good disk performance and reliability. We recommend using Raid-10 or Raid-6.
For more information, including best practices for Disk Safes, read Disk Safe Best Practices
1. To create a Disk Safe, for click Disk Safe on the left under the "Settings" tab. Then click "New Disk Safe" on the top left. 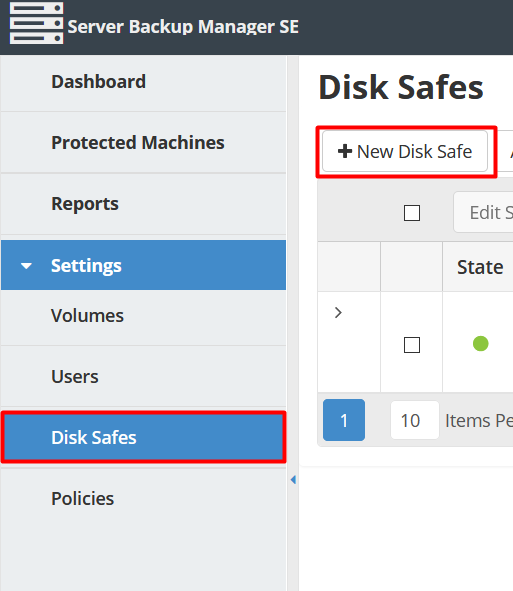
2. The Disk Safe pane will pop up now allowing you to enter the details required to create a Disk Safe. 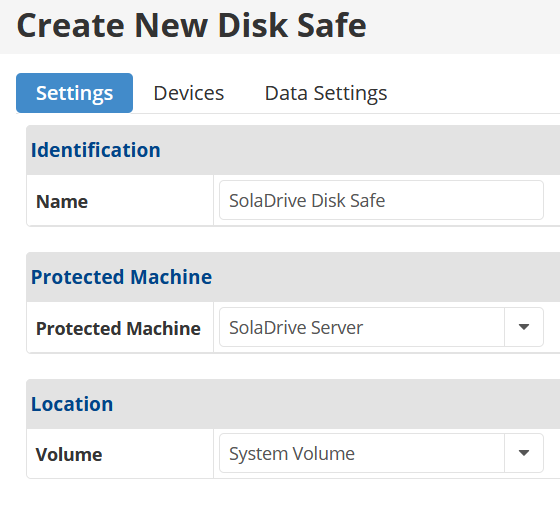
- Name: You will want to enter the name of the Disk Safe so it's easily distinguishable from other Disk Safes.
- Protected Machine: This is the server you are planning to backup, if you have multiple servers you will need to select which one. That servers data will be stored on this Disk Safe.
- Volume: This should be created already for you by the system administrator or has Super-User rights. If not you should contact your system administrator or if you have Super-User rights you can create this Volume and give it permission to be used by this Protected Machine.
3. Devices Tab will show all storage devices or hardware on your server, but only if R1Soft is able to connect to your server. You can then select or deselect devices you don't wish to have backed up.
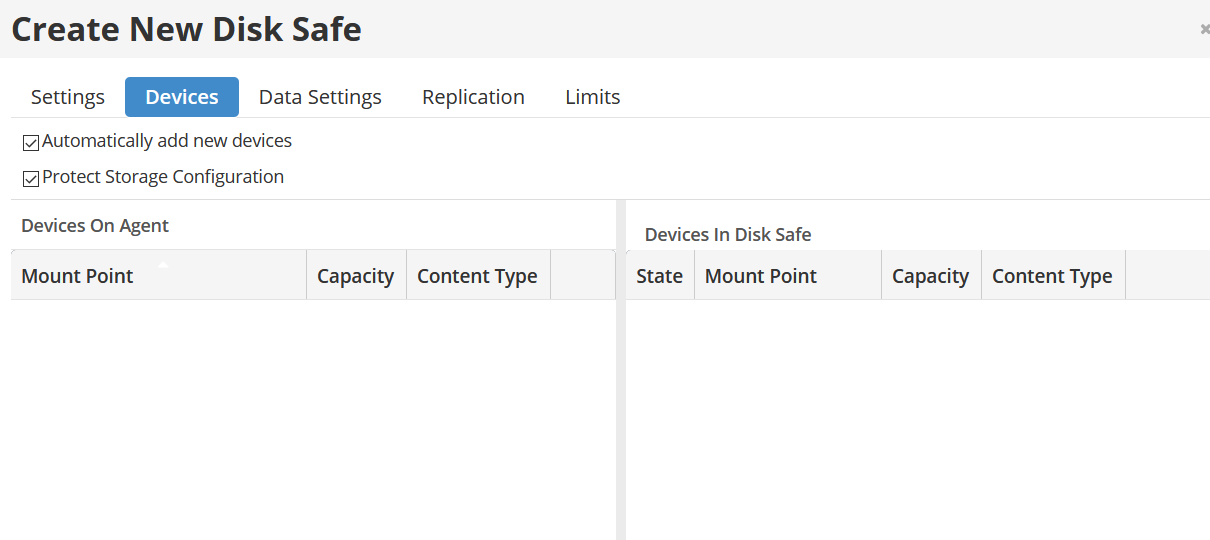
- Automatically add new devices - This option will automatically add all available hardware/devices of your server, even if new ones are added. For example, if you add a new hard drive or SSD to your server.
- Protect Storage Configuration - This option will backup your partition tables, this is recommended in case you ever need to do a Bare Metal Restore of your server.
- Devices On Server - This section shows you the hardware/devices that are currently on the connected server. You can then select or deselect devices you don't wish to have backed up.
- Devices In Disk Safe - If you have run any backups, this section shows you the hardware/devices that are assigned to your Disk Safe already.
4. Data Settings Tab allows you to select the compression type and encryption of your backups.
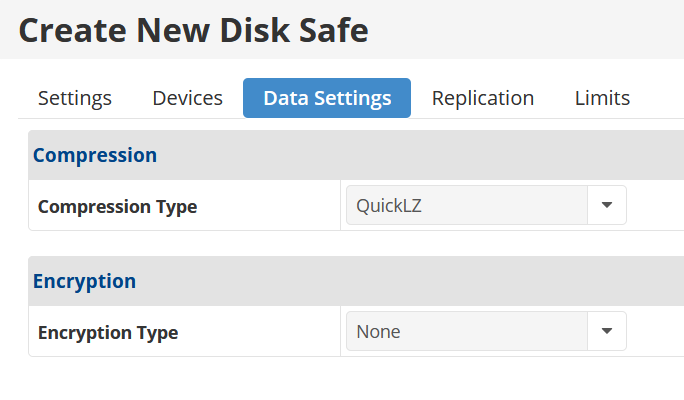
Compression Type
- None - This is the default value and means that there won't be any compression applied to the data backups. This is the fastest over local connections and private networks.
- Zlib - This type of compression is best for backups over public connections or slow links as it compresses the data before transferring. Disk Safes that use zlib, also known as gzip compression, provide about a 2:1 compression ratio.
- QuickLZ - QuickLZ type of compression is the fastest one, which can reach 308 Mbyte/s per core. It can compress your backups for lower bandwidth usage and save on disk space footprint but it comes at the cost of using more CPU to compress your backups before transferring.
Encryption Type
- AES 256-bit - To secure your disk safe you can protect it with an AES 256-Bit encryption key. This is a good idea if you have sensitive data that you don't want prying eyes on or in the event the server gets hacked. But keep in mind, every time you want to browse files, browse users, browse databases, or initiate a Bare Metal Restore, you'll need to provide the password.
5. Limits Tab
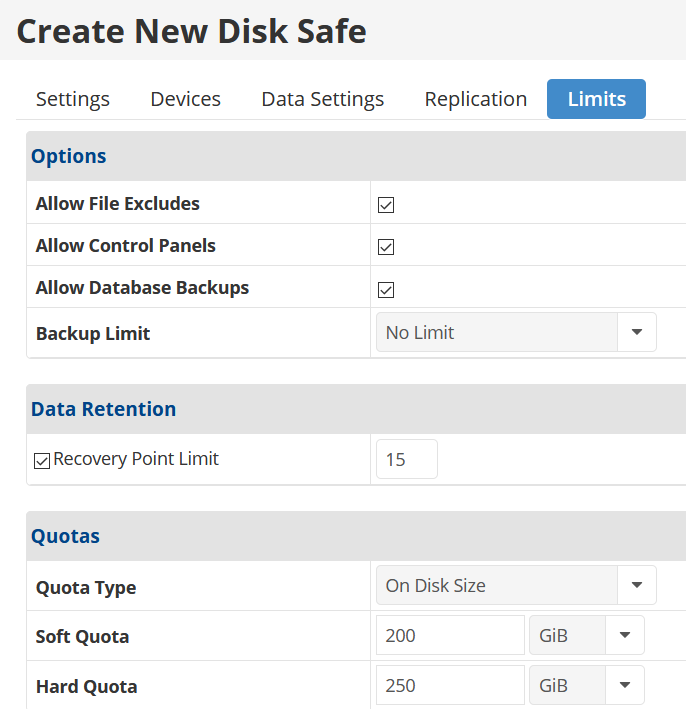
- Allow File Excludes - This option will allow your to create backup policies (or schedules) excluding files or folders.
- Allow Recovery Point Archiving - Selecting this will allow you to select specific daily, weekly, monthly or yearly backups and permanently archive them until you reach your recovery point limit or you delete it.
- Allow Control Panels - This activates the Control Panels feature for the Disk Safe. This option will enable you to integrate your R1Soft backups with your control panel. This means your clients will be able to backup and restore their individual account on demand.
- Allow Database Backups - Enabling this will allow your backup policy to backup all databases on the server when it runs. If this is not selected, all SQL, Exchange and MySQL options will be disabled while creating a Policy.
- Backup Limit - This option specifies the lowest replication frequency allowed for the disk safe. So when creating a backup schedule (Policy), you will not be able to select a lesser frequency than defined here.
Data Retention
- Recovery Point Limit - The recovery point limit is what controls how many backups you retain at any given time for this Disk Safe. When creating a backup schedule Policy you will not be able to have more daily, weekly, monthly, and yearly retention points than the recovery limit specified here.
- Archive Point Limit - If you enabled "Allow Recovery Point Archiving" above then this option will ask you how many total archive points are allowed on this Disk Safe.
Quotas
- Quota Type - This is the type of quota that will be used by the Disk Safe and limit the disk usage of the Disk Safe. The limit is based on the amount of space occupied by the Disk Safe or the size of deltas. Deltas are the data that has changed since the last backup run.
- Soft Quota - The value set here will give a warning that informs users that they are close to reaching their effective limit.
- Hard Quota - If this value is reached, the system will no longer allow generation of any new Recovery Points.
6. You can now click Create Disk safe and make your way to Creating a Policy to start scheduling when backups run.

