To effectively engage with customers, incorporating email features becomes essential. While most interactions involve generic emails, personalizing certain elements, like the recipient's name, holds great value. This tutorial aims to guide you on crafting email templates with dynamic variables, enabling you to insert personalized information. Moreover, you will learn how to implement an email template within the Odoo email dialog.
The focus of this article lies in creating a birthday greeting email template. This template will incorporate variables to dynamically include the recipient's name and their associated company name. Additionally, we will integrate a "Send Happy Birthday" button into the contact form, which automatically loads our customized email template.
Step 1: Create a dependency. To begin crafting email templates, it is necessary to create a new module and correctly configure the manifest.py file. In Odoo, a custom module should be created within the addons folder. The addons folder is the default location where Odoo looks for custom modules and where all built-in modules are also stored. It is typically found in the following directory:
/path/to/odoo/source/odoo/addonsBe sure to create your new module inside the 'addons' folder. When you create a new module in Odoo, it should follow a standard folder structure for proper organization and functionality. The typical folder structure for this new module is as follows:
send_happy_birthday/
    ├── __init__.py
    ├── __manifest__.py
    ├── models/
    │   ├── __init__.py
    │   └── res_partner.py  # Example Python file for the model 'res.partner'
    ├── views/
    │   ├── __init__.py
    │   └── res_partner_view.xml  # Example XML file for the view 'res.partner'
    ├── data/
    │   └── mail_template_data.xml  # Example XML file for email template data
    └── static/
        └── description/
            └── index.html  # Optional: Add module description and documentation
The folder and file structure for Odoo modules can be explained as follows:
-
__init__.py: An empty file that indicates that the folder is a Python package. -
__manifest__.py: The manifest file contains metadata and configuration information about the module, such as the module's name, version, dependencies, data files, etc. -
models/: This folder contains Python files that define your module's models, which are classes that inherit from Odoo's base models. -
views/: This folder contains XML files that define the user interface and views of your module, such as forms, trees, and search views. -
data/: This folder includes XML files that define static data, like records to be created during the module installation, email templates, etc. -
static/description/: This folder is optional and can be used to add documentation and description of your module.
Open the manifest.py file and include 'mail' as a dependency since our module will be utilizing email features. This dependency is essential for accessing mail templates and dialogs. Additionally, we should add a dependency to 'contacts' to enable modifications to the contact form. The final 'manifest.py' file should appear as below.
{
    'name': 'Send Happy Birthday',
    'version': '1.0',
    'summary': 'Send a discount to a customer on their birthday',
    'description': 'This module add a "Send Happy Birthday" button to the contact form and loads an email template to send to that contact ',
    'author': 'Your Name',
    'depends': ['contacts', 'mail'],
    'data': [
        # List of data files (XML files, etc.)
        'views/res_partner_view.xml',
        'data/mail_template_data.xml',
    ],
    'installable': True,
    'application': True,
    'auto_install': False,
}
Step 2: To begin, you'll need an email template. Create a new file named 'mail_template_data.xml' in the 'data' folder of your custom module. Now that you have the necessary dependencies set up, it's time to construct the email template itself. In Odoo, email templates are built using XML, and when you send the template to someone, Jinja2 will render the email and populate it with the relevant data.
To ensure the email template remains intact without being overwritten, we should use the noupdate="1" tag. This tag serves a crucial purpose: without it, the email template would be updated and replaced each time you update the module. Consequently, any modifications you made to the template would be lost. By using the noupdate="1" tag, you prevent this issue from occurring.
Step 3: Edit the mail_template_data.xml' file to create a new XML record as follows:
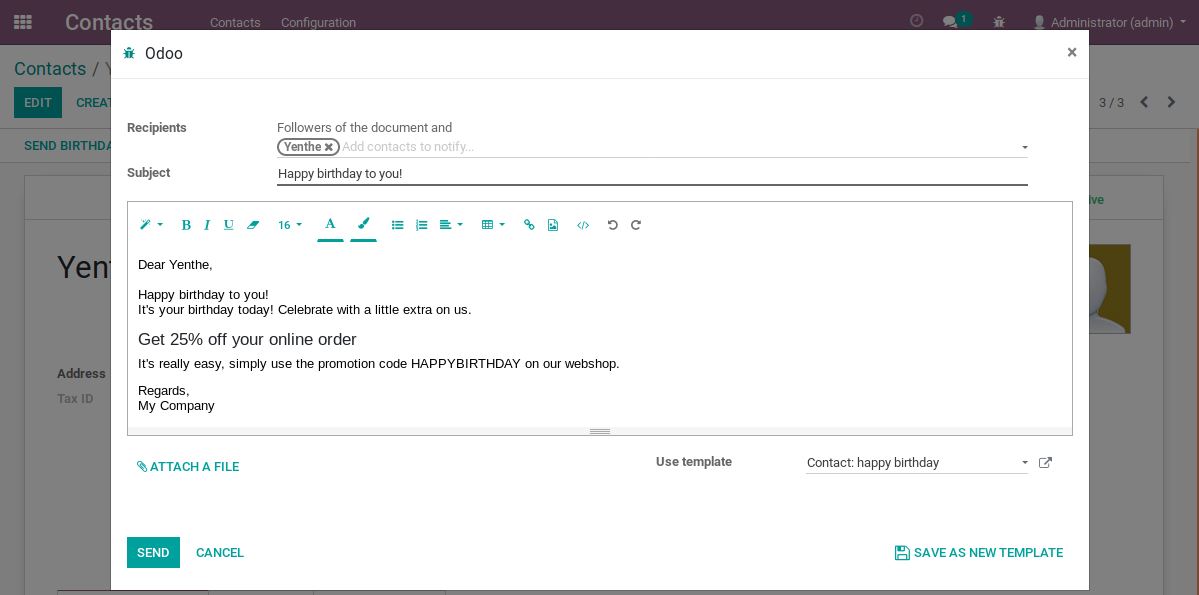
<record id="email_template_happy_birthday" model="mail.template" noupdate="1">
  <field name="name">Contact: happy birthday</field>
  <field name="model_id" ref="base.model_res_partner"></field>
  <field name="email_from">${object.user_id.email_formatted |safe}</field>
  <field name="partner_to">${object.id}</field>
  <field name="subject">Happy birthday to you!</field>
  <field name="body_html" type="html">
    <div style="margin: 0px; padding: 0px;">Dear ${object.name},
      <br>
      <br>
      <p>Happy birthday to you!
        <br>It's your birthday today! Celebrate with a little extra on us.
      </p>
      <h3>Get 25% off your online order</h3>
      <p>It's really easy, simply use the promotion code HAPPYBIRTHDAY on our webshop.</p>
      <p>Regards
        <br>${object.company_id.name}
      </p>
    </div>
  </field>
</record>
Let's explore the purpose of this configuration. The first line is of utmost importance as it contains the record id and record model. To create any email template, it must be associated with the 'mail.template' model, where all email templates are stored, including your custom one. Now, let's break it down line by line:
-
The 'name' field: This provides a name for your email template, which will be visible when viewing all templates under Settings > Technical > Email > Templates.
-
The 'model_id' field: This specifies the model to which your email template is linked and from which it will fetch data. It should always start with 'model_' followed by the model name, with dots replaced by underscores. For instance, if the model is 'res.partner,' it should be written as 'res_partner.'
-
The 'email_from' field: Here, you include the email address from which the email will be sent. In this example, it represents the email address of the person initiating the send action.
-
The 'partner_to' field: This field is linked to the ID of the current contact, automatically loading the contact's email address as the recipient of the email.
-
The 'subject' field: It determines the title or subject of the email that will be sent to the user.
-
The 'body_html' field: This is where you can design the content of the email using HTML and Jinja2 variables. It allows you to style the template and pre-fill data before sending the email.
Jinja is a contemporary and user-friendly templating language for Python, seamlessly integrated into Odoo. To retrieve values from any field, you can simply use the syntax ${object.your_field_name}. When the email is sent out, Odoo/Jinja automatically converts these calls to the corresponding value set on the field of that particular record. It is also possible to fetch values from another model, such as ${object.user_id.name} to obtain the name of the salesperson. For more in-depth information and examples, you can refer to the documentation and examples available on the Jinja website.
Step 3: Inherit the form view. Now that we've crafted the email template, our focus shifts to enabling an effortless way to send it to our contacts. The most straightforward approach in Odoo involves adding a button to the form, along with a designated function that triggers the email dialog. To accomplish this, create a new XML file named 'res_partner_view.xml' within the 'views' folder of your custom module. In this file, we will inherit the contacts form and incorporate a header section containing a button, which will be associated with a specific function.
<odoo>
  <record id="res_partner_birthday_form_view" model="ir.ui.view">
    <field name="inherit_id" ref="base.view_partner_form"></field>
    <field name="model">res.partner</field>
    <field name="arch" type="xml">
      <xpath expr="//sheet" position="before">
        <header>
          <button name="action_send_birthday_email" string="Send birthday email" type="object"></button>
        </header>
      </xpath>
    </field>
  </record>
</odoo>
In this view, we will place a button with the text "Send birthday email" at the top of the contacts form. By utilizing the "type=object" attribute and specifying the button name, we can now invoke a Python function associated with it.
Step 4: Create the function. Create a fresh Python file named 'res_partner.py' within the 'models' folder. Inside this Python file, we'll inherit the 'res.partner' model and proceed to define a new Python function called 'action_send_birthday_email'.
# -*- coding: utf-8 -*-
from odoo import api, fields, models

class ResPartner(models.Model):
    _inherit = 'res.partner'

    def action_send_birthday_email(self):
        self.ensure_one()
To open the email dialog with our email template preloaded, we require four essential steps. Initially, we need to locate the email template, then load the composer, and subsequently, set context values on it. Finally, we must return an action to display the dialog to the end user. To begin, we utilize the '_xmlid_lookup' function to find the template ID. If the function successfully locates the ID, we should set it accordingly. In the event the template is not found, we set the ID as False.
ir_model_data = self.env['ir.model.data']
try:
    template_id = ir_model_data._xmlid_lookup('tutorial_create_email_template.email_template_happy_birthday')[1:3][1]
except ValueError:
    template_id = False
As observed, you can locate the template by combining the technical name of your application, which in this example is 'tutorial_create_email_template', with the name of your email template. Now, our next objective is to find the composer, also utilizing the '_xmlid_lookup' function. If the composer is found, we should set its ID accordingly; otherwise, we should set it to False.
try:
    compose_form_id = ir_model_data._xmlid_lookup('mail.email_compose_message_wizard_form')[1:3][1]
except ValueError:
    compose_form_id = False
Moving forward, the subsequent step involves defining context values for our mail dialog. These context values are essential as they guide Odoo on how to load the dialog appropriately.
ctx = {
    'default_model': 'res.partner',
    'default_res_id': self.ids[0],
    'default_use_template': bool(template_id),
    'default_template_id': template_id,
    'default_composition_mode': 'comment',
    'force_email': True
}
Lastly, we must send all the values to the front end, ensuring that the user receives the email dialog with our template displayed as the default choice.
return {
    'type': 'ir.actions.act_window',
    'view_mode': 'form',
    'res_model': 'mail.compose.message',
    'views': [(compose_form_id, 'form')],
    'view_id': compose_form_id,
    'target': 'new',
    'context': ctx,
}
To present the dialog with the default values, we utilize the above-mentioned values. The function returns an action window to load the dialog and explicitly informs Odoo that we wish to employ the default composer. With the context properly set, Odoo can deduce the model for rendering the template and the desired default template. Your final function should now appear as follows:
def action_send_birthday_email(self):
    """
    This function opens a window to compose an email, with the happy birthday template message loaded by default
    """
    self.ensure_one()

    ir_model_data = self.env['ir.model.data']
    try:
        """
        Find the email template that we've created in data/mail_template_data.xml
        _xmlid_lookup first needs the module name where the template is built and then the name
        of the email template (the record id in XML).
        """
        template_id = ir_model_data._xmlid_lookup('tutorial_create_email_template.email_template_happy_birthday')[1:3][1]
    except ValueError:
        template_id = False

    try:
        """
        Load the e-mail composer to show the e-mail template in
        """
        compose_form_id = ir_model_data._xmlid_lookup('mail.email_compose_message_wizard_form')[1:3][1]
    except ValueError:
        compose_form_id = False

    ctx = {
        # Model on which you load the e-mail dialog
        'default_model': 'res.partner',
        'default_res_id': self.ids[0],
        # Checks if we have a template and sets it if Odoo found our e-mail template
        'default_use_template': bool(template_id),
        'default_template_id': template_id,
        'default_composition_mode': 'comment',
        'force_email': True
    }

    # Will show the e-mail dialog to the user in the frontend
    return {
        'type': 'ir.actions.act_window',
        'view_type': 'form',
        'view_mode': 'form',
        'res_model': 'mail.compose.message',
        'views': [(compose_form_id, 'form')],
        'view_id': compose_form_id,
        'target': 'new',
        'context': ctx,
    }
You've completed the process! By saving all your modifications and installing the custom module, you'll notice the appearance of the "Send birthday email" button. Clicking on it will open the email dialog, loaded with our personalized email template as shown below.