

Odoo supports integration with popular payment gateways such as PayPal, Stripe, Authorize.Net, Adyen, Worldpay, and many others. These integrations can be achieved through Odoo's modular structure and extensive range of available modules.
To integrate a third-party payment gateway with Odoo, you typically need to install the appropriate payment module for the specific gateway. Odoo's marketplace offers a wide range of payment gateway modules developed by the Odoo community and official partners. These modules enable seamless integration with the desired payment gateway.
Once the payment gateway module is installed, you can configure the necessary settings such as API credentials, payment methods, currencies, and other parameters specific to the payment gateway. This allows you to accept payments from your customers through the integrated gateway.
This article will outline how to integrate Paypal and Authorize.net with Odoo.
How to Integrate Paypal

The popularity of PayPal as a payment option on your website depends on your region. It can either be widely favored or potentially not accepted by anyone. However, one thing is certain: if you aim to have a global e-commerce site, offering PayPal as a payment method will undoubtedly boost your sales.
Step 1: Installing the PayPal Processor. Once you have installed the eCommerce application, you can easily access the PayPal payment processor by following these steps: navigate to the Invoicing menu, proceed to Payments, and finally click on Payment Acquirers. Locate the PayPal payment processor in the provided list and activate it.
Upon activation, Odoo will promptly install the PayPal processor. You will then have the opportunity to specify the required details, including the PayPal email ID and the PayPal Merchant ID. To learn how to locate this information and configure the processor, you can refer to a step-by-step video tutorial. The tutorial will guide you through the process, ensuring a clear understanding of the necessary steps and configuration requirements.
Step 2: Configure your PayPal Account Settings.To ensure smooth communication between your PayPal account and Odoo's eCommerce framework, certain settings in your PayPal Account need to be adjusted. Some of these settings include:
-
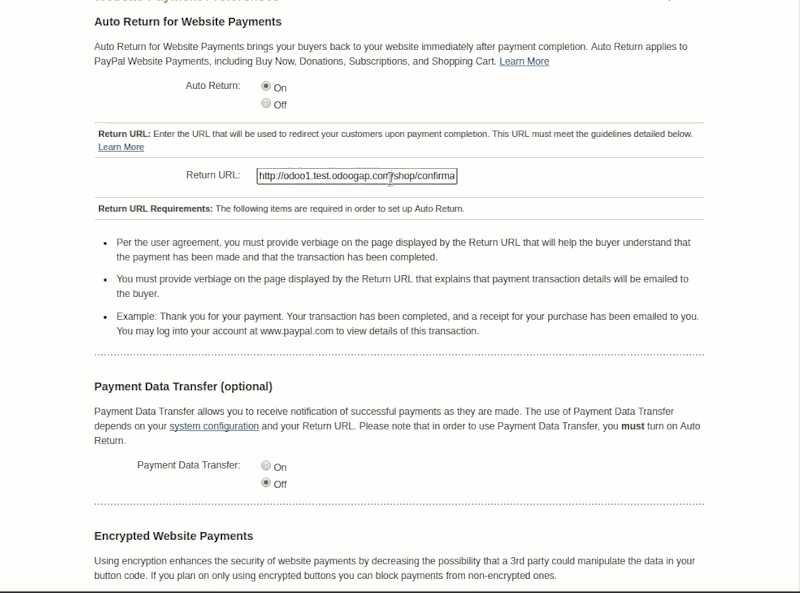
Auto Return for Website Payments: You need to configure this setting in your PayPal account and specify the associated Return URL. Odoo provides a shop confirmation page, and you simply need to indicate it in your PayPal account settings.
-
Configure Instant Payment Notification (IPN): In your PayPal account, you should enable IPN (instant payment notification) and specify the corresponding URL. The default URL for Odoo installations is typically set as http://www.yourodoosite/payment/paypal/ipn/.
-
Set up your Sandbox Account in PayPal: When conducting testing and simulations of processes in Odoo, it is advisable not to create actual transactions. PayPal offers a sandbox account specifically designed for testing purposes, allowing you to validate your Odoo installation.
When a customer submits the cart in Odoo, they will be redirected to PayPal's site to register the payment and complete the transaction. The benefit of this setup is that you won't be handling any credit card or payment information directly from the customer. Once PayPal finishes processing the transaction, it will send the necessary information back to Odoo.
It is essential to carefully review the transaction information and observe how Odoo manages it. By ensuring proper configuration, Odoo will update the sales order as processed and verify the amount returned from PayPal.
How to Integrate Authorize.net
![]() Step 1: Open an account with Authorize.net. To establish the payment process with Authorize.net, users need to start by creating an account with Authorize.net. During this account setup, they will need to provide API credentials, transaction keys, and other required information.
Step 1: Open an account with Authorize.net. To establish the payment process with Authorize.net, users need to start by creating an account with Authorize.net. During this account setup, they will need to provide API credentials, transaction keys, and other required information.
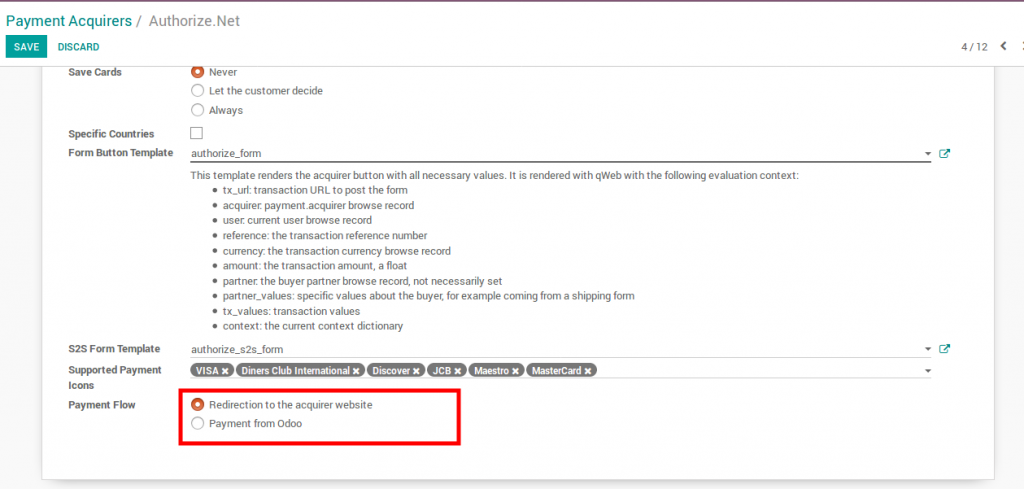
Before delving into the payment flow, it's important to understand the two available methods in Odoo as shown in the image below:
-
Redirection to the acquirer website: In this method, customers are redirected to the Authorize.net website to complete the payment process. Odoo facilitates redirection, ensuring a seamless transition for the users.
-
Payment from Odoo: Alternatively, customers can complete the payment directly within the Odoo platform. This method allows for a smoother user experience as customers can make the payment without leaving the Odoo environment.
By comprehending these payment flow options and following the necessary setup steps with Authorize.net, users can establish a functional and efficient payment process in Odoo.
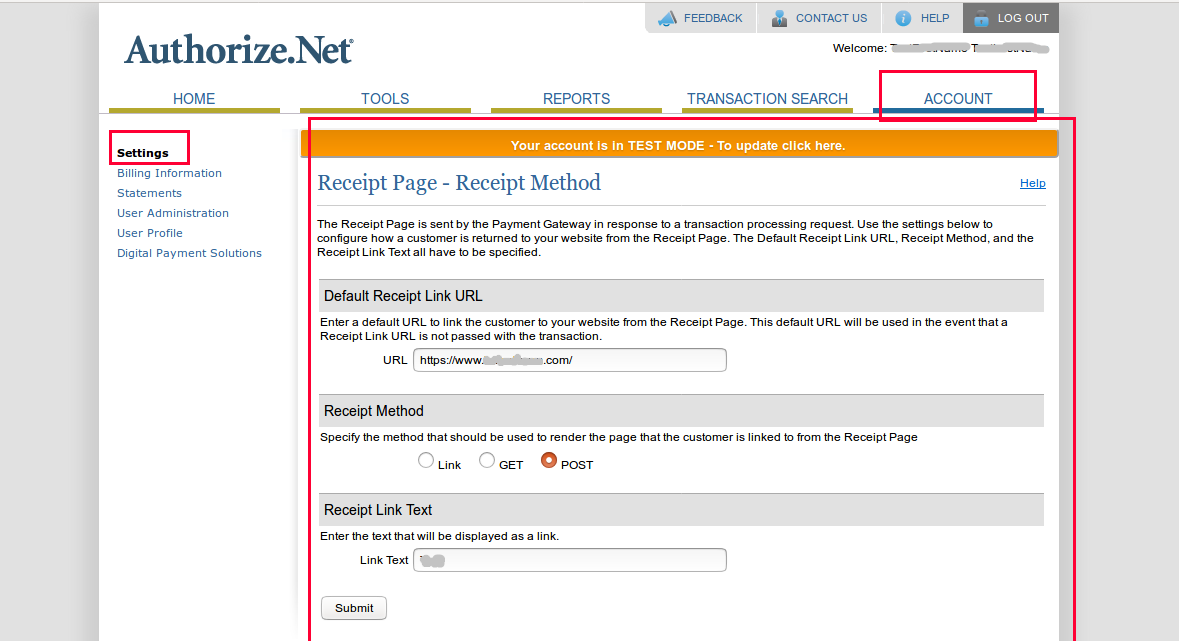
Step 2: Configure the Response/Receipt URLs. Under the Accounts menu on the settings page, you will come across the Transaction format settings and Security settings as shown below.
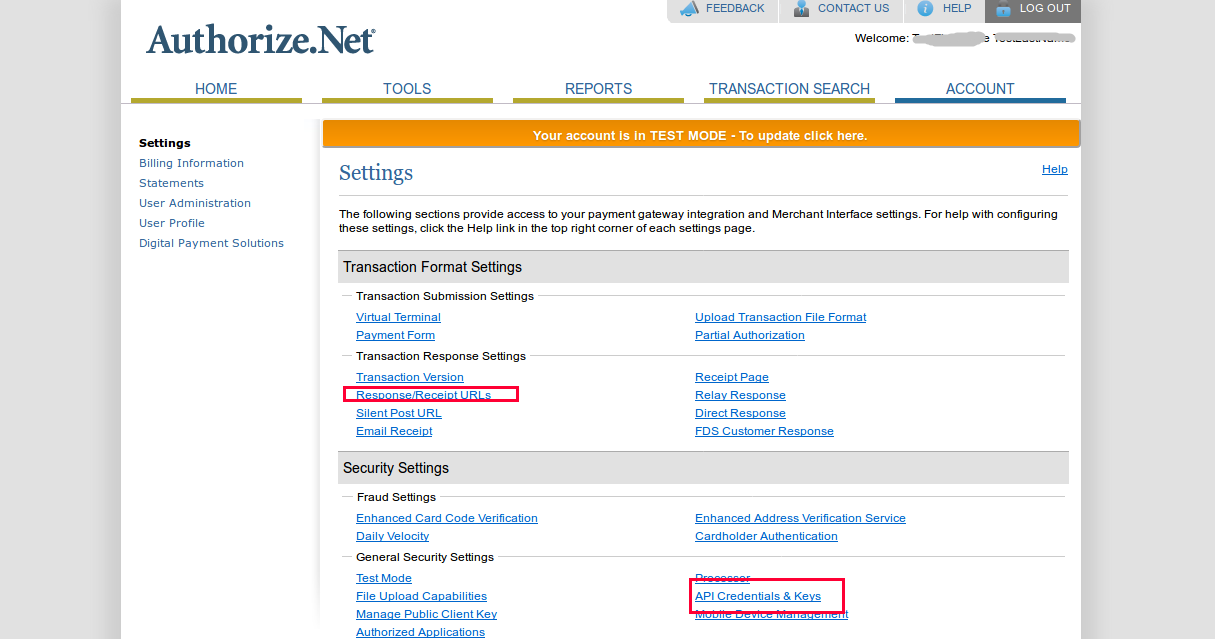 In the Transaction format settings, locate and choose the 'Response/Receipt URLs' option. Fill in the necessary fields with the requested information, including the receipt URL, receipt method, and receipt link text. After providing the required details, simply click the 'Submit' button to proceed. See the image below.
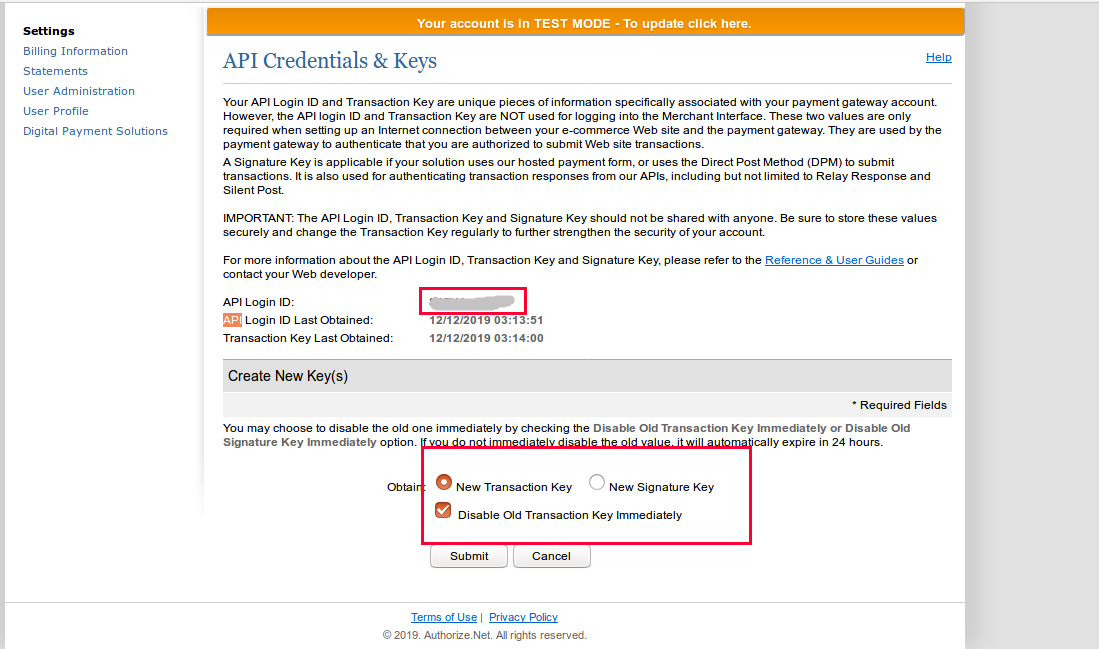
 Step 3: Configure API credentials and keys. Within the 'API Credentials and Keys' page, you will find the API Login ID. To generate new keys, select the required information under the 'Create New Keys' section and then click on the 'Submit' button. The page appears as shown below.
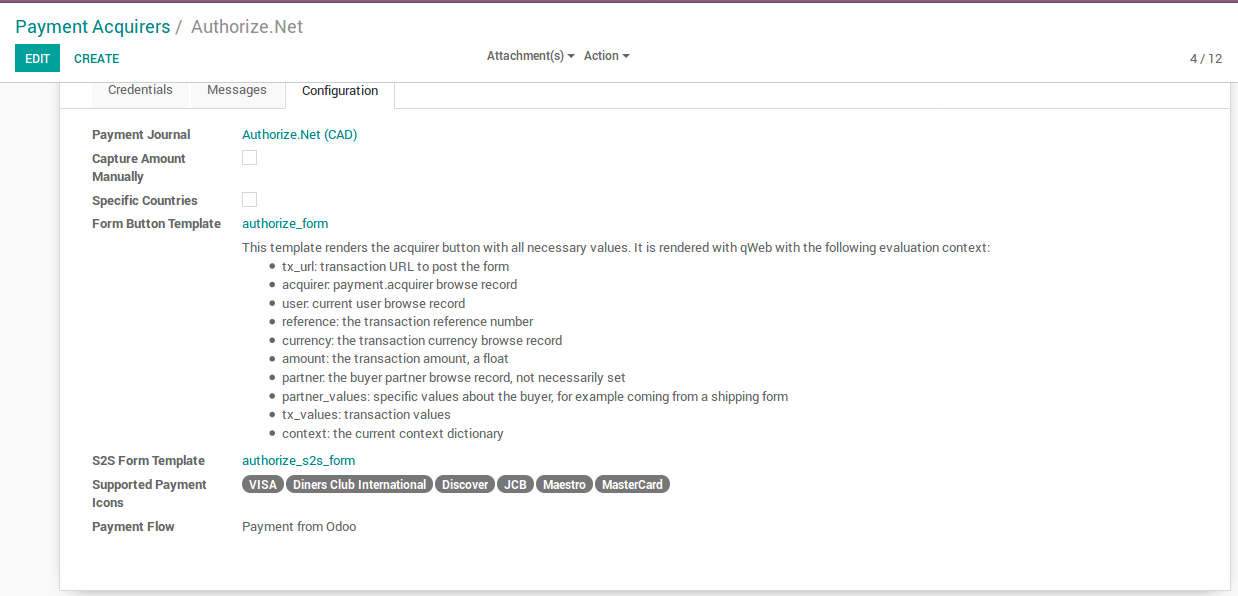
Step 4: Within the Odoo ERP, navigate to the Authorize.net payment gateway. On the dedicated page for the selected payment gateway, you will be prompted to input essential configuration details, including payment journal, form button template, supported payment icons, payment flow, and more. Additionally, make sure to enter the API login and transaction key credentials obtained from Authorize.net into the corresponding fields. The page appears as shown below.
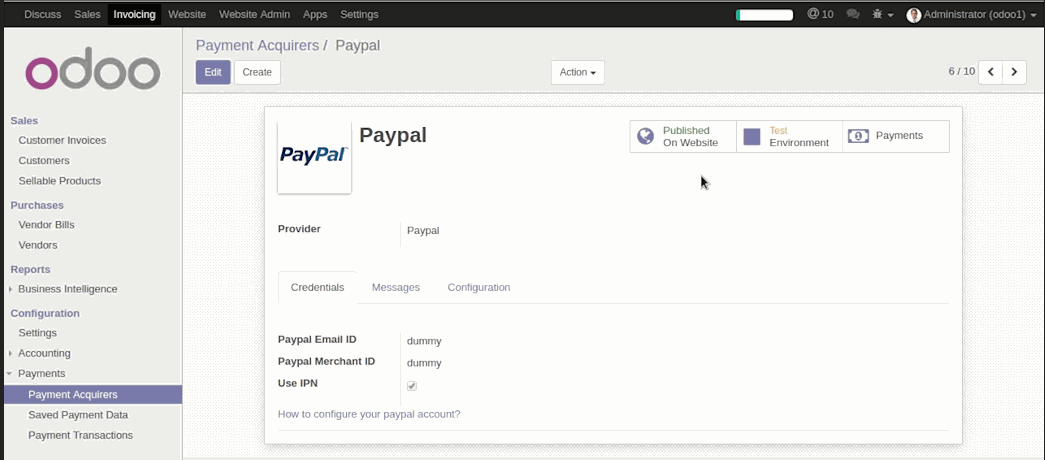
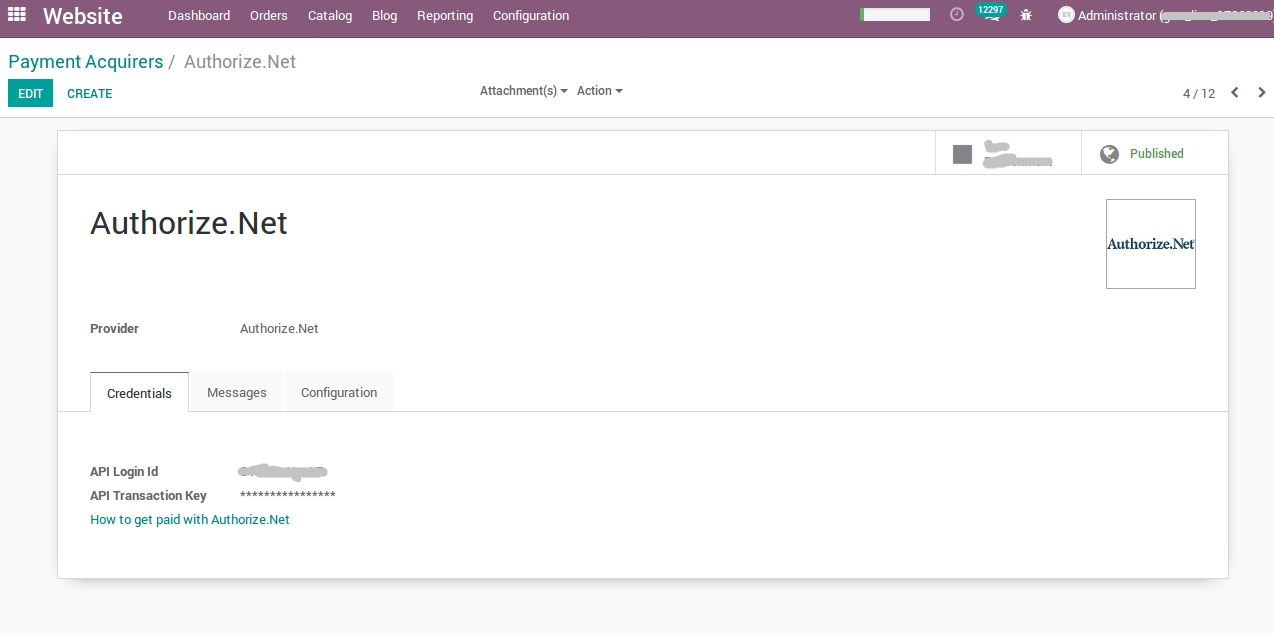
 The home page of the specified payment gateway provides a comprehensive view of all the provided details regarding the payment gateway. It serves as a centralized location where you can access and review essential information related to the payment gateway configuration. This includes settings, preferences, supported features, and any additional details relevant to the payment gateway integration. By visiting the home page of the payment gateway, you can conveniently access and visualize all the necessary information at a glance. See the image below.
The integration of the payment gateway in Odoo is successfully completed, allowing for seamless payment processing. To ensure everything is functioning as expected, you can proceed to test the payment process using a demo sales order. This allows you to simulate a transaction and verify that the payment integration is working effectively. For instance, when the sales order advances to the payment process, the subsequent screen will be presented.
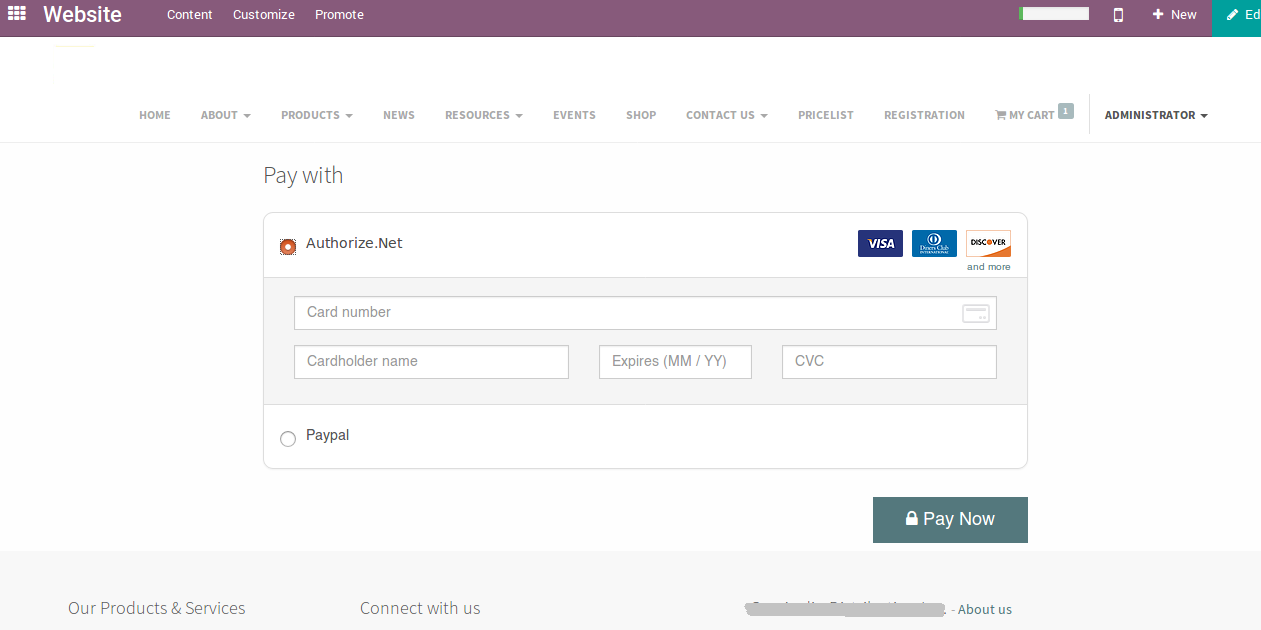
The provided image showcases the 'Pay with' screen, where you have the option to choose your preferred payment method. Once the payment is successfully processed, the system automatically generates an invoice specifically for that particular sales order. This streamlined process ensures accurate invoicing and smooth transaction management within the Odoo system.
In today's digital era, integrating multiple payment gateways has become essential due to the widespread use of online banking by consumers. SolaDrive offers services for integrating both built-in and third-party payment gateways. If you have any inquiries or require assistance regarding payment gateway integration in Odoo, please don't hesitate to reach out to us.

