

In this article, we're diving into the powerful integration of Gmail and Odoo, with a focus on Odoo's Mail Plugins. These connectors act as a bridge between your mailbox and Odoo's database, allowing you to perform direct actions like creating leads and centralizing prospect emails in the CRM app, generating tasks in Odoo projects, and creating Helpdesk tickets. Specifically, we'll explore the seamless Gmail integration. The Gmail Plugin seamlessly connects an Odoo database to a Gmail inbox, enabling users to effortlessly manage their tasks across both platforms, ensuring no loss of information. This is how to configure Gmail in Odoo.
For Odoo.sh Hosting
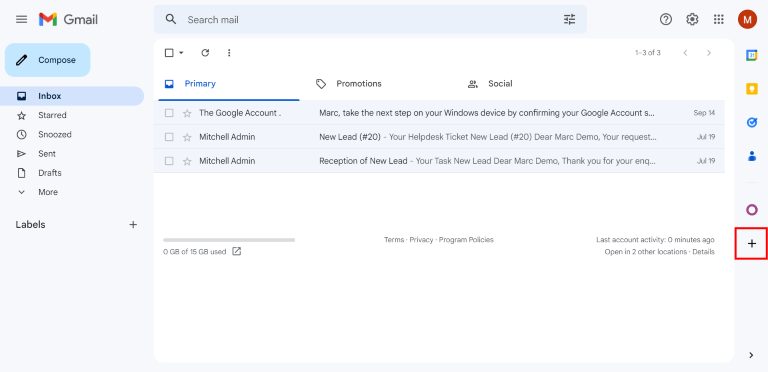
Step 1: Install the Gmail plugin. Log in to the Gmail account you intend to link with Odoo. Then navigate to the Gmail inbox and select the plus sign icon located on the right-side panel to access add-ons. If the side panel is not visible, click the arrow icon at the bottom right corner of the inbox to reveal it. See the image below.
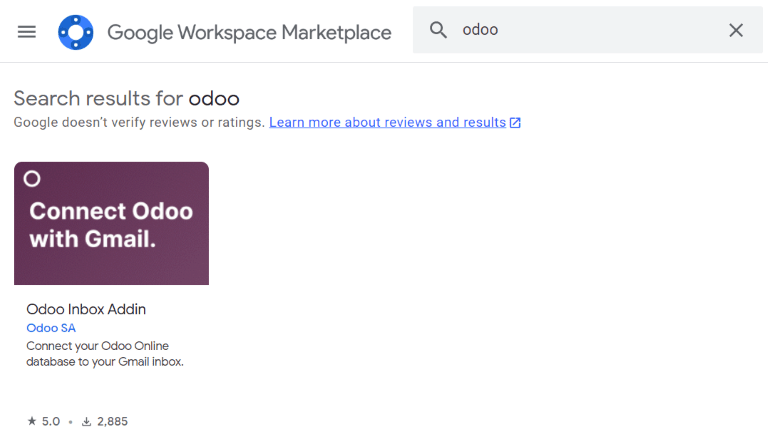
Then, search for "Odoo" in the search bar and locate the Odoo Inbox Addin as shown below. you can also go directly the "Odoo Inbox Addin" page using this link.
Click on the "Install" button, followed by "Continue" to initiate the installation process. Then, choose the Gmail account the user wants to link to Odoo. Click "Allow" to grant Odoo access to the Google account. Google will then display a pop-up confirming the successful installation.
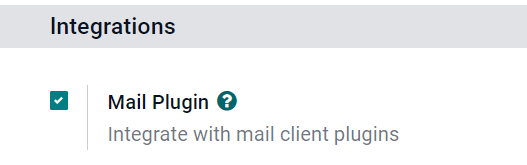
Step 2: Activate the plugin. To fully leverage the functionalities of the Gmail Plugin, it is crucial to enable the corresponding Mail Plugin feature within the Odoo database. This process involves navigating to the Settings section and selecting General Settings. Within the Integrations subsection, specifically, locate the Mail Plugin option and activate it as shown below. After making this configuration change, ensure to save the adjustments. Enabling the Mail Plugin establishes the connection between Odoo and Gmail, facilitating seamless integration and enhancing the user experience.
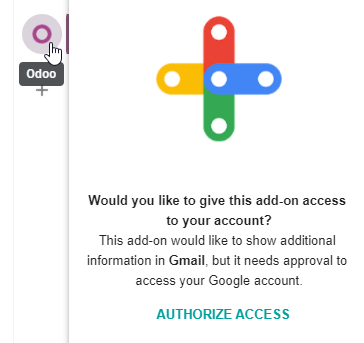
Step 3: Configure the Gmail inbox. In your Gmail inbox, look for a purple Odoo icon on the right-hand side as shown below. Click on it. The Odoo plugin window pops up. Now, just pick any email from your inbox and click on it. Inside the plugin window, click on the "Authorize Access" button to let Odoo connect to your Gmail inbox. This ensures a seamless link between Odoo and Gmail, making your workflow a breeze.
For Self-Hosted Odoo
Google has security guidelines for add-on creators, requiring them to provide a list of URLs for actions and redirections initiated by the add-on. These measures safeguard users from potential security threats, ensuring that add-ons do not redirect users to harmful websites. However, because Odoo can only list the general domain odoo.com and not the specific unique server domains of on-premise customers, those using on-premise installations cannot install the Gmail Plugin directly from the Google Workspace Marketplace.
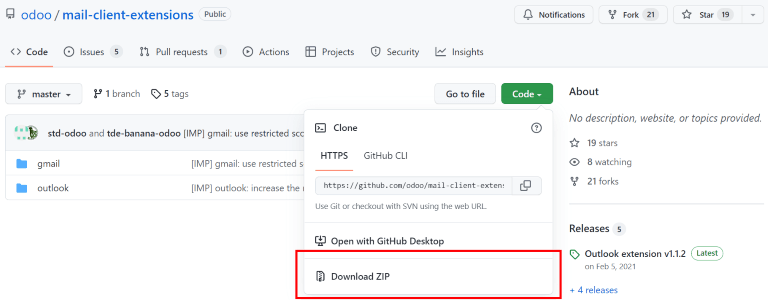
Step 1: Download the Gmail plugin. For on-premise or self-hosted implementations, the Gmail plugin is downloaded and installed from GitHub. To do this, click here to go to the GitHub repository for the Odoo Mail. Then click on the green "Code" button to display the download links as shown below. Click on "Download ZIP" to save the compressed file on your local machine.
Step 2: Unzip the downloaded file on your computer. Navigate to the directory mail-client-extensions-master -> gmail -> src -> views, and locate the file named login.ts. Open this file using a text editor of your choice, such as Notepad (for Windows), TextEdit (for Mac), or Visual Studio Code.
Step 3: Configure the plugin. Within the login.ts file, identify and remove the following three lines of text and save. This removes the "odoo.com" domain constraint from the Gmail Plugin.
if (!/^https:\/\/([^\/?]*\.)?odoo\.com(\/|$)/.test(validatedUrl)) {
     return notify("The URL must be a subdomain of odoo.com");
}
Within the same ZIP file, navigate to mail-client-extensions-master -> gmail, and open the file named "appsscript.json". Inside the "appsscript.json" file, locate the "urlFetchWhitelist" section and replace all references to "odoo.com" with the unique server domain of your Odoo instance.
Step 4: Install the plugin. In the same gmail folder, open the file called README.md. Inside the README.md file, find and follow the instructions provided to push the Gmail Plugin files as a Google Project. Ensure that your computer can execute Linux commands before proceeding with the instructions outlined in the README.md file. This is crucial for successfully following and implementing the provided guidance. These adjustments ensure that the plugin is tailored to work seamlessly with the specific server domain of the Odoo customer.
By completing these actions, you effectively eliminate the domain constraint, allowing for more customized and flexible integration of the Gmail Plugin within the Odoo environment.
Step 5: Activate the plugin. To fully leverage the functionalities of the Gmail Plugin, it is crucial to enable the corresponding Mail Plugin feature within the Odoo database. This process involves navigating to the Settings section and selecting General Settings. Within the Integrations subsection, specifically, locate the Mail Plugin option and activate it as shown below. After making this configuration change, ensure to save the adjustments. Enabling the Mail Plugin establishes the connection between Odoo and Gmail, facilitating seamless integration and enhancing the user experience.
Step 6: Configure the Gmail inbox. In your Gmail inbox, look for a purple Odoo icon on the right-hand side as shown below. Click on it. The Odoo plugin window pops up. Now, just pick any email from your inbox and click on it. Inside the plugin window, click on the "Authorize Access" button to let Odoo connect to your Gmail inbox. This ensures a seamless link between Odoo and Gmail, making your workflow a breeze.

